![LottoShield Logo -2.png]](https://help.lottoshield.com/hs-fs/hubfs/LottoShield%20Logo%20-2.png?height=50&name=LottoShield%20Logo%20-2.png)

⚠️ Note: Setting up a BackOffice connection can be tricky depending on your store layout. If this process feels overwhelming, we highly recommend involving an IT technician to assist with BackOffice setup.
Before You Start
✅ What You’ll Need Before Starting
Please have the following items on hand before beginning setup:
| Item | Notes |
|---|---|
| Windows PC or Laptop | Must run Windows OS and have a USB or Ethernet port. |
| USB-to-Ethernet Adapter | Buy Here – Only needed if your PC has no built-in Ethernet port. |
| 5-Port Network Switch | Buy Here – Required if your router ports are already in use. |
| Ethernet Cable (Cat5 or Cat6) | Ensure it's long enough to reach your router. |
| Internet Router Access | Your PC must be plugged into the same internet router as the Acumera device. |
Getting Started
🔌 Step 1: Physically Connect Your Devices
-
Locate the Ethernet port on your PC.
If none exists, plug in your USB-to-Ethernet adapter and connect the cable there. -
Connect your Ethernet cable:
-
One end goes into your PC (or adapter).
-
The other end must go into the same router that the Acumera device is connected to.
💡 If all router ports are in use, plug in your network switch to the router and move one of the existing cables into the switch. Then connect your PC to the switch.
-
💻 Step 2: Retrieve Your PC’s IP Address
-
On your PC, open the Start menu and type
cmd. -
Right-click Command Prompt and select Run as administrator.
-
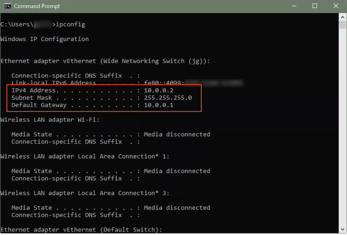
In the command window, type:
ipconfig -
Press Enter and look for the IPv4 Address on your PC (e.g.,
10.0.0.5).
📌 Important: Save your PC's IP address—Acumera will need it to enable your BackOffice connection.

☎️ Step 3: Contact Acumera
Call Acumera Support at (512) 368-9619, then press Option 3.
Tell them:
-
You're setting up a new BackOffice connection.
-
Provide the IPv4 address in the Command Prompt from your PC. Acumera can provide steps to find it if needed.
-
If you're using cloud-based back office software like PetroSoft (CStore), let Acumera know to add a secondary BackOffice connection (not replace your existing one PetroSoft is using).
Ask Acumera for your XML Gateway IP Address and save this for later. You'll need to reach the XML Gateway and for your LottoShield software.
⚠️ Heads up: Acumera may need to reboot Acumera your router, which could cause up to 5 minutes of downtime. No credit card transactions or fuel purchases should be processed during this time.
⚙️ Step 4: Configure Your PC’s Network Settings
-
Open the Control Panel and go to:
Network and Internet > Network and Sharing Center > Change adapter settings -
Identify the active Ethernet connection:
-
Temporarily unplug the Ethernet cable from your PC.
-
The connection that displays a red ❌ is the one you need to configure.
-
-
Reconnect the Ethernet cable. Right-click the correct network and choose Properties.
-
Select
Internet Protocol Version 4 (TCP/IPv4), then click Properties. -
Choose Use the following IP address and enter:
-
IP Address: Your IPv4 Address from
ipconfig -
Subnet Mask:
255.255.255.0 -
Default Gateway: The Default Gateway from
ipconfig(⚠️ NOT the XML Gateway) -
Preferred DNS Server:
8.8.8.8 -
Alternate DNS Server:
8.8.4.4
-
Click OK when complete.
🔀 Step 5: (Optional) Add Persistent Route for Dual NICs
If your PC is connected via both Ethernet and Wi-Fi, you’ll need to set a persistent route.
-
Open Command Prompt as administrator.
-
Type the following in Command Prompt based on your POS type:
✅ Note: [XML Gateway IP] - Is given by Acumera.
[Default Gateway IP] - 🔎 Search Cmd > open > type ipconfig then press enter > Locate Default Gateway IP.
For Verifone:
route add -p [XML Gateway IP] MASK 255.255.255.0 [Default Gateway IP]
- Replace [XML Gateway IP] with XML IP Acumera gave you
- Replace [Default Gateway IP] with IP that shows in the Command Prompt on your PC
For Gilbarco:
route add -p [XML Gateway IP] MASK 255.255.255.0 [Default Gateway IP]
- Replace [XML Gateway IP] with XML IP Acumera gave you
- Replace [Default Gateway IP] with IP that shows in the Command Prompt on your PC
-
Press Enter, go back to Change adapter settings:
-
Right-click the Acumera connection.
-
Click Disable, right click again then Enable. This refreshes the route.
-
For Verifone POS
-
Open a browser and go to:
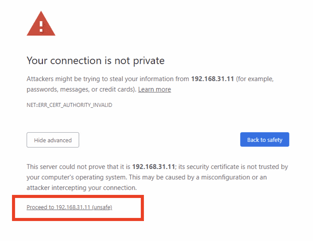
https://192.168.31.11/ConfigClient.html -
If successful, you'll see the Petroleum C-Store Control Center.
⚠️ You may get a browser warning. Click “Advanced” and “Proceed” to continue.
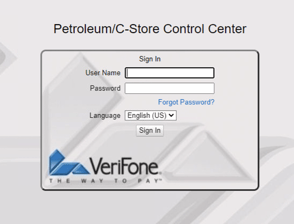
Now it’s time to configure your Verifone POS!
For Gilbarco POS
-
Open File Explorer and paste this into the address bar:
\\10.5.48.2 -
Enter credentials when prompted:
-
Username:
BackOffice -
Password:
BackOffice
-
Capitalization matters—both “B” and “O” must be uppercase.
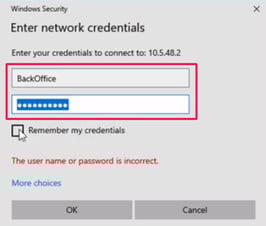
Click Remember my credentials. When you’re done click OK.
In the new window, you should see the XML Gateway folder.
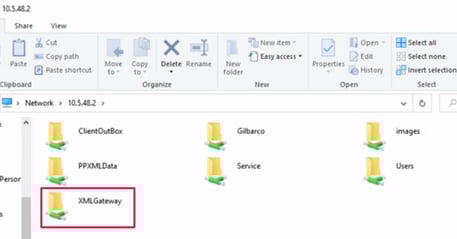
Now it’s time to configure your Gilbarco Passport POS!
If you hit any roadblocks, use LottoShield Live Chat Support—we’re here to help you every step of the way.