![LottoShield Logo -2.png]](https://help.lottoshield.com/hs-fs/hubfs/LottoShield%20Logo%20-2.png?height=50&name=LottoShield%20Logo%20-2.png)
⚠️ Note: Setting up a BackOffice connection can be tricky depending on your store layout. If this process feels overwhelming, we highly recommend involving an IT technician to assist with BackOffice setup.
Before You Start
Make sure that you have the following on hand: Purchase Items before moving on.
- Windows PC or Windows Laptop (This is required)
- If you purchase a laptop there must be an ethernet port available.
- USB to Ethernet adapter - Click Here for purchase recommendation
- This is only required if you don't have an available ethernet port on your PC or laptop
- Port Switch (Minimum of 5 ports) - Click Here for purchase recommendation
- Make sure you have this just in case. Some Managed network services boxes only have one dedicated port for back office connection. If the back office port is in use that is when the Port Switch is needed to share the connection.
- Ethernet cable (Cat 5 or Cat 6)
- This will be required if your PC is not able to connect with Wi-Fi. Not all PC's have the capability to connect to Wi-Fi.
- Your cable needs to be long enough to connect from your PC to the managed network service box.
Getting Started
Locate the ethernet port on your computer. The picture below shows what an ethernet port looks like.
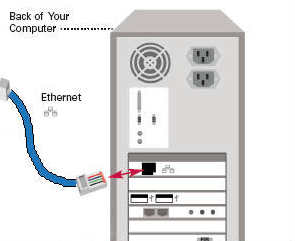
Plug your ethernet cable into your computer. If your computer does not have a free ethernet port, use the USB to ethernet adapter. Plug the USB into an available USB port on the PC or laptop. Plug your ethernet cable into the Ethernet port on the adapter.
Plug the other end of your ethernet cable into Port 3 of your Fortinet box. If port 3 on the fortinet box is in use already you'll need to connect the Port Switch to the Fortinet port 3. All the other connections will connect directly to the Port Switch.
Back Image of Foritnet Box - Port 3 marked by red box

If your Foritnet box on site is has more ports than what you see here. Then you're looking at the wrong box and you may not have this box. You might have a Hughes Box.
Computer Settings
Need Help from a CS rep? Use the LottoShield live Chat support if you want assistance after you've made your connection. Continue on if you'd like to try yourself.
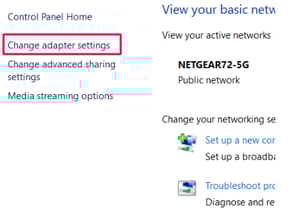
Once you’ve plugged your cables in, go to your windows machine. Open up the search and type Control Panel. In the results, click Control Panel.
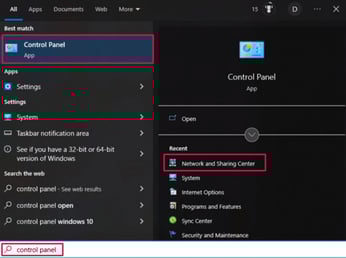
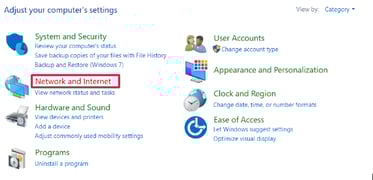
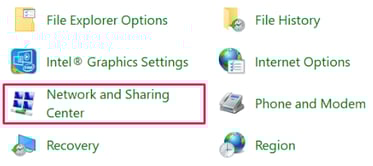
Click Network and Sharing Center.
In the right menu, click Change adapter settings.
Now you need to find which of the connections is connected to your Fortinet box.
- Note: Now, temporarily unplug your PC ethernet cable from your Fortinet or Switch. Whichever connection changed to a red x icon is the one to your Fortinet box.
Notice in the first Image below you had two connection. You unplugged the Fortinet cable and the one that said Network 6 was the one that disconnected. That will be the one you configure in this process. (This is just an example)


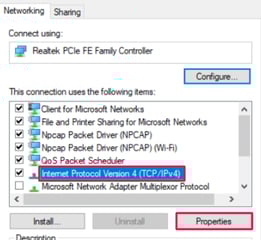
Reconnect your ethernet cable. Right-click on the Fortinet connection and select Properties.

In the new window, click Internet Protocol Version 4 (TCP/IPv4) and then click Properties.
In the image below Click "Use the following IP address"
Now we need to get your IP's that you will fill in the IPv4.
Who is your Service Provider? Sagenet or Hughesnet
- If Sagenet is your service provider call (888) 424-4211. Let them know you are setting up a back office and need the Back Office IP’s. Ask for the following IP addresses and then enter them into the networking window.
- If Hughesnet is your service provider call (800) 788-6000. Press Option 1 when prompted. Let them know you are setting up a back office and need the Back Office IP’s. Ask for the following IP addresses and then enter them into the networking window.
IP Address: 10.XXX.XX.XXX (ask)
Subnet: 255.255.255.240 (usually 240, ask)
Gateway: 10.XXX.XX.XXX (ask)
Preferred DNS: 8.8.8.8
Alternate DNS: 8.8.4.4
If you have trouble at this point and have all the IP's you can also contact LottoShield chat support to assist. You must have the IP's in order for us to assist here.
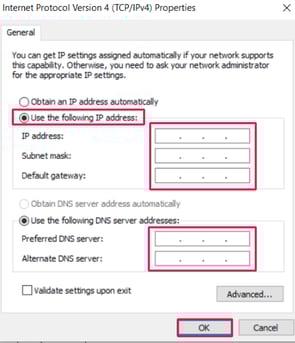
When you’re done click OK.
Dual NICs
If your computer has more than one connection, then you need to add a persistent route. If you need help ask LottoShield live chat support.
Open up the search and type Cmd. In the results, hover over Command Prompt and select Run as administrator.
- Duel NIC is when you have two connections. This could be two ethernet connections or one ethernet connection with Wi-Fi on.
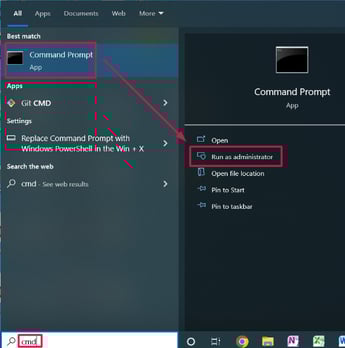
If you don’t see the Run as administrator option, then right-click on Command Prompt and select the option there.
In the command prompt, type the following based on what register your store uses:
Verifone Sites: route add -p 192.168.31.11 MASK 255.255.255.240 10.XXX.XX.XXX

Gilbarco Passport Sites: route add -p 10.5.48.2 MASK 255.255.255.240 10.XXX.XX.XXX

When you’re done, hit the Enter key. You’ve now added a persistent route! You'll need to go back to the connections in Change adapter settings. The connection for Fortinet, you'll need to right click it and select disable. Then right click it again and click enable. This will allow the route to go in affect.
Checking Register connection is successful
For Verifone POS sites
Open any web browser (google chrome, Microsoft Edge, Firefox) and enter the following web address into your address bar: https://192.168.31.11/ConfigClient.html
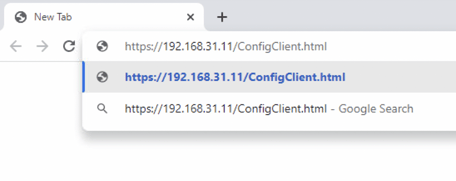
If the connection is successful you should have reached the Petroleum C-Store Control Center.
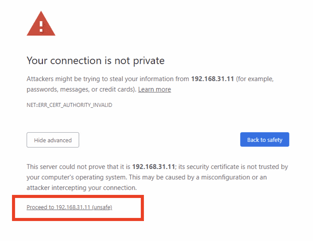
- Note: You may receive a notice that your connection is not private, click Proceed.
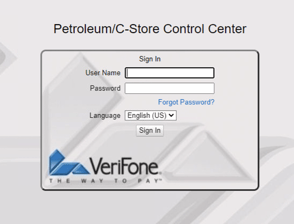
Now it’s time to configure your Verifone POS!
For Gilbarco Passport sites
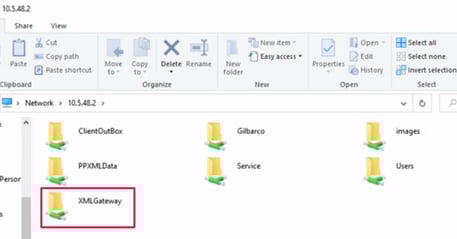
Open your file explorer and enter the following in the quick access bar: \\10.5.48.2

Hit the Enter key.
This Windows Security might open and ask for the XML gateway login prompt.
- Username: BackOffice
- Password: BackOffice
- Notice that the B and O are Capital letters this is very important
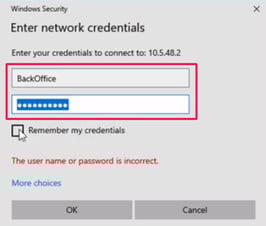
Click Remember my credentials. When you’re done click OK.
In the new window, you should see the XML Gateway folder.
Now it’s time to configure your Gilbarco Passport POS!