![LottoShield Logo -2.png]](https://help.lottoshield.com/hs-fs/hubfs/LottoShield%20Logo%20-2.png?height=50&name=LottoShield%20Logo%20-2.png)

✅ What You’ll Need Before Starting
Make sure you have the following equipment ready:
| Item | Notes |
| Windows PC or Laptop | Required. Must have an Ethernet port or USB slot. |
| USB-to-Ethernet Adapter | Buy Here – Use if your device lacks a built-in Ethernet port. |
| 5-Port Network Switch | Buy Here – Needed if the Cybera BackOffice port is already in use. |
| Ethernet Cables (Cat5 or Cat6) |
The first cable must be long enough to connect your PC to the Cybera box. A second short cable may be required if you need to use the 5-Port Network Switch to split the Backoffice port on your Cybera MNSP. |
🔌 Step 1: Connect Your PC to the Cybera Box
-
Locate the Ethernet port on your PC.
If none is available, use a USB-to-Ethernet adapter. -
Plug one end of the Ethernet cable into your PC (or adapter).
-
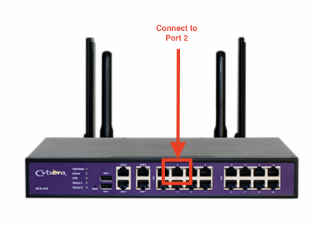
Plug the other end into the BackOffice port on your Cybera box:
-
Typically Port 2 is used.
-
BackOffice ports (LAN 1–4) could as be used if configured by cybera.
-
💡 Not sure which port to use? Contact Cybera Support at 📞 (866) 429-2372, Option 1.
🟡 If the BackOffice Port is Occupied
If the required port is already in use:
-
Unplug the existing cable.
-
Connect a Network Switch to that port.
-
Plug the original cable and your PC’s cable into the switch.
💻 Step 2: Configure Your Network Settings
Need help? Use LottoShield Live Chat Support anytime.
- On your PC, open the Start Menu → type
Control Panel→ click to open. - Navigate to:
Network and Internet > Network and Sharing Center > Change adapter settings - Identify the Cybera connection:
- Temporarily unplug the Ethernet cable.
- The connection that shows a red ❌ is the correct one.
- Plug it back in.
- Right-click that connection → Properties.
- Select
Internet Protocol Version 4 (TCP/IPv4)→ click Properties. - Choose Use the following IP address and enter:
Cybera IP IP Address 10.96.10.2Subnet Mask 255.255.255.0Default Gateway 10.96.10.1Preferred DNS 8.8.8.8Alternate DNS 8.8.4.4On occasion, Cybera MNSPs use different settings and you will need to contact Cybera Support for the correct settings at 📞 (866) 429-2372, Option 1. - Click OK to save.
Step 3: Dual Network Interface Cards (NIC)
Dual NIC is when you have two connections. This could be two ethernet connections or one ethernet connection with Wi-Fi on. If you have a single connection, you may skip this step.
If your computer has more than one connection, then you need to add a persistent route. If you need help ask LottoShield live chat support.
Open up the search and type Cmd. In the results, hover over Command Prompt and select Run as administrator.
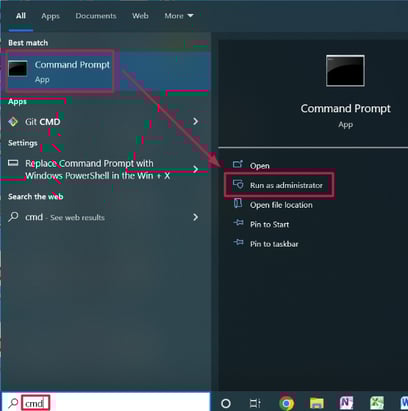
If you don’t see the Run as administrator option, then right-click on Command Prompt and select the option there.
In the command prompt, type the following based on what register your store uses:
Verifone Sites: route add -p 192.168.31.11 MASK 255.255.255.0 10.96.10.1

Gilbarco Passport Sites: route add -p 10.5.48.2 MASK 255.255.255.0 10.96.10.1
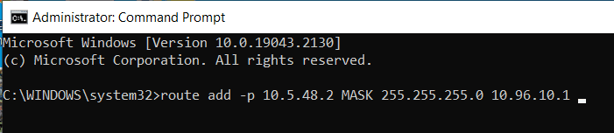
When you’re done, hit the Enter key. You’ve now added a persistent route! You'll need to go back to the connections in Change adapter settings. The connection for cybera, you'll need to right click it and select disable. Then right click it again and click enable. This will allow the route to go in affect.
On occasion, Cybera requires different route settings and you will need to contact Cybera Support for the correct settings at 📞 (866) 429-2372, Option 1.
Checking Register connection is successful
The last thing you need to do is check your register connections. See the directions below for your register.
For Verifone POS sites
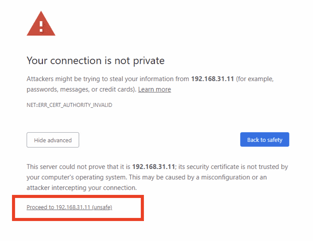
Open any web browser (google chrome, Microsoft Edge, Firefox) and enter the following web address into your address bar: https://192.168.31.11/ConfigClient.html
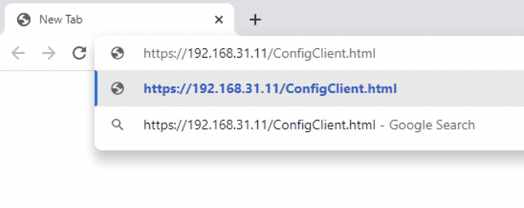
If the connection is successful you should have reached the Petroleum C-Store Control Center.
- Note: You may receive a notice that your connection is not private, click Proceed.
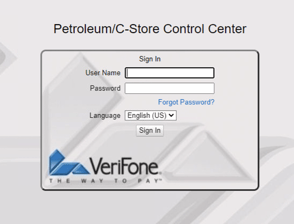
Now it’s time to configure your Verifone POS!
For Gilbarco Passport sites
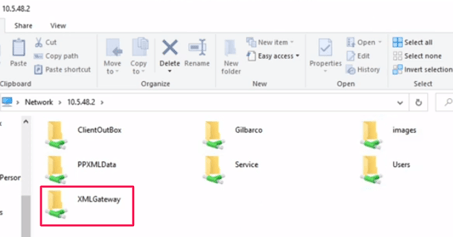
Open your file explorer and enter the following in the quick access bar: \\10.5.48.2
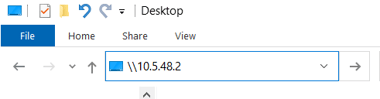
Hit the Enter key.
This Windows Security might open and ask for the XML gateway login prompt.
- Username: BackOffice
- Password: BackOffice
- Notice that the B and O are Capital letters this is very important
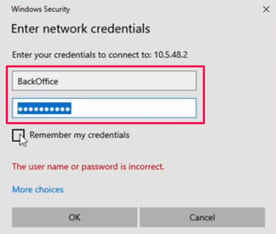
Click Remember my credentials. When you’re done click OK.
In the new window, you should see the XML Gateway folder.
Now it’s time to configure your Gilbarco Passport POS!